Email domain security is the combination of DNS-based authentication protocols, SPF, DKIM, and DMARC, that verify a sender's identity, block email spoofing, and protect your domain reputation with every message you send. When all three protocols are correctly configured, receiving mail servers can confirm that an email actually came from your domain, not an attacker impersonating it. Without them, anyone can send email that appears to come from your address, and your recipients, your deliverability, and your brand pay the price.
We see it constantly: businesses spend months building a solid email marketing program, only to watch open rates crater because their DNS records were never set up properly. It's a frustrating problem, and the fix is more straightforward than most people expect. So let's walk through exactly what you need, how each protocol works, and how to check whether your domain is already protected.
What Is Email Domain Security?
Email domain security is a framework of authentication protocols published in your DNS that tells the world which servers are authorized to send mail on your behalf. It covers three core standards: SPF (Sender Policy Framework), DKIM (DomainKeys Identified Mail), and DMARC (Domain-based Message Authentication, Reporting and Conformance). Each handles a different layer of verification, and together they form your domain's complete defense against impersonation and spoofing.
Your DNS is essentially a public directory for your domain. When you add an SPF record, DKIM record, or DMARC record to your DNS, you're publishing a set of instructions that any receiving mail server can check before deciding whether to deliver your email. No special software on the recipient's side is required. It runs automatically, every time someone receives a message from your domain.
Think of it like this: your domain has a reputation, and that reputation is worth protecting. Every spoofed email sent in your name chips away at it, whether or not your own systems sent the message.
Why Email Domain Security Matters for Your Organization
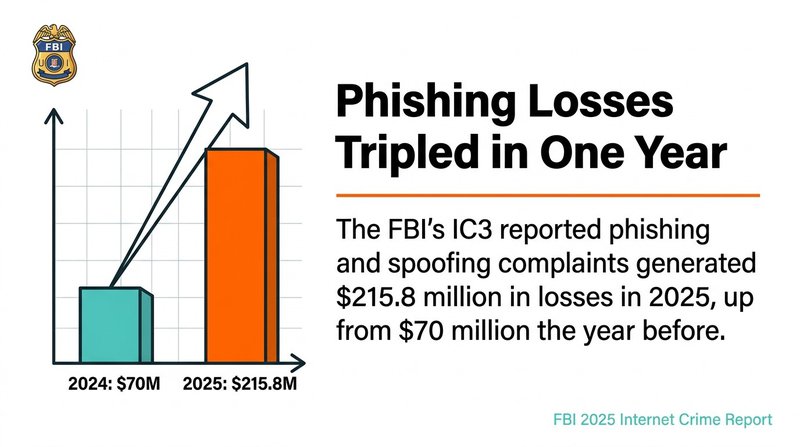
Phishing and email spoofing are among the most financially damaging threats businesses face, with the FBI's IC3 reporting that phishing and spoofing complaints generated $215.8 million in losses in 2025, up from $70 million the year before, according to the FBI's 2025 Internet Crime Report. That's a staggering jump in a single year. And it doesn't just hit large enterprises.
Your domain reputation is directly tied to email deliverability. If your domain gets flagged for spoofing activity, or if you have no DMARC policy in place to signal that you take authentication seriously, inbox providers like Gmail start routing your legitimate mail to spam. That means lower open rates, fewer conversions, and a harder climb back to inbox placement.
Compliance requirements have also tightened. PCI DSS v4.0 mandated that organizations handling cardholder data implement DMARC, SPF, and DKIM, effective March 31, 2025, according to Mimecast's PCI DSS compliance analysis. This isn't just a best practice anymore. For many industries, it's a regulatory requirement. Getting your email authentication right protects your customers, your domain health, and your legal standing all at once.
And clean email lists are part of this picture too. Strong email domain security stops attackers from spoofing your domain, but email security best practices for marketers also include keeping your own sending list free of invalid addresses that damage your sender reputation from the inside out.
How SPF Protects Your Email Domain
SPF, or Sender Policy Framework, is a DNS TXT record that lists every IP address and mail server authorized to send email for your domain. When a receiving server gets an email claiming to be from your domain, it checks your SPF record to confirm the sending IP is on your approved list. If the IP isn't listed, the email fails SPF authentication.
Setting up an SPF record is one of the fastest wins in email domain security. You add a single TXT record to your DNS, and it looks something like this:
v=spf1 include:_spf.google.com ip4:203.0.113.10 ~all
Each mechanism has a specific job. The include: mechanism pulls in an authorized sender's IP range, like Google Workspace or your email service provider. The ip4: mechanism authorizes a specific IP address. The ~all at the end is a softfail qualifier, meaning mail from unlisted IPs will be marked suspicious but not outright rejected. Use -all (a hard fail) once you're confident you've listed every legitimate sending source.
SPF Record Mechanisms at a Glance
- a: authorizes the IP address in your domain's A record
- mx: authorizes IPs listed in your MX records
- ip4 / ip6: authorizes specific IPv4 or IPv6 addresses
- include:: imports another domain's SPF record (use for ESPs like Mailchimp or HubSpot)
- ~all: softfail for unlisted senders
- -all: hard fail, reject mail from unlisted senders
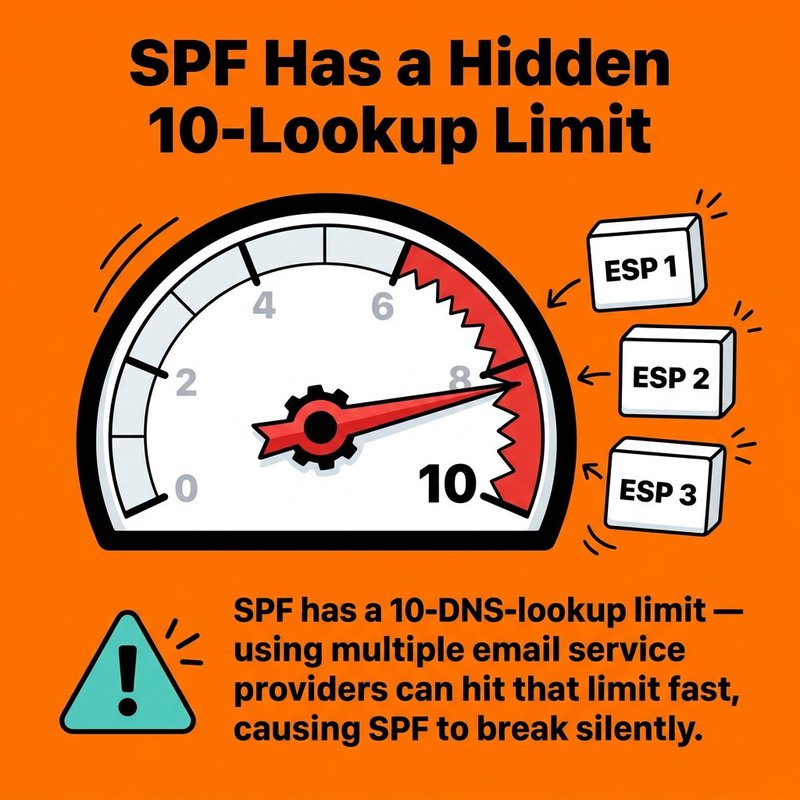
One thing to watch: SPF has a 10-DNS-lookup limit. If you use multiple email service providers, like ActiveCampaign, HubSpot, and Mailchimp all at once, you can hit that limit fast. When you do, SPF breaks silently and you won't know until deliverability drops. Audit your SPF record regularly against every platform you're actually sending from.
How DKIM Authenticates Your Outgoing Emails
DKIM, or DomainKeys Identified Mail, adds a cryptographic signature to every outgoing email, allowing receiving servers to verify that the message was genuinely sent from your domain and that its content wasn't altered in transit. It uses a public/private key pair: your mail server signs each message with a private key, and the public key is published as a DNS TXT record anyone can check.
This matters because SPF only checks the sending IP. DKIM checks the actual message content and the signing domain. An attacker who routes mail through a legitimate server can pass SPF and still fail DKIM. The two protocols cover different attack surfaces, which is exactly why you need both.
How to Set Up DKIM
The process has four steps:
- Generate a public/private key pair in your email platform or mail server settings (Google Workspace, Microsoft 365, and most ESPs do this for you automatically).
- Copy the public key provided by your email platform.
- Add it to your DNS as a TXT record under a selector subdomain, for example: google._domainkey.yourdomain.com
- Enable DKIM signing in your email platform settings and verify the record is live.
Your DKIM TXT record will look something like this:
v=DKIM1; k=rsa; p=MIIBIjANBgkqhkiG9w0BAQEFAAOCAQ...
The p= value is your public key. It should be long. If it's short, something went wrong in the generation step. Use a DKIM checker tool to confirm the record resolves correctly from external DNS before considering setup complete.
How DMARC Ties Email Authentication Together
DMARC, or Domain-based Message Authentication, Reporting and Conformance, is the policy layer that tells receiving mail servers what to do when an email fails SPF or DKIM, and it sends reports back to you showing exactly who is sending email in your domain's name. Without DMARC, SPF and DKIM failures produce no action. With DMARC, you control the outcome.
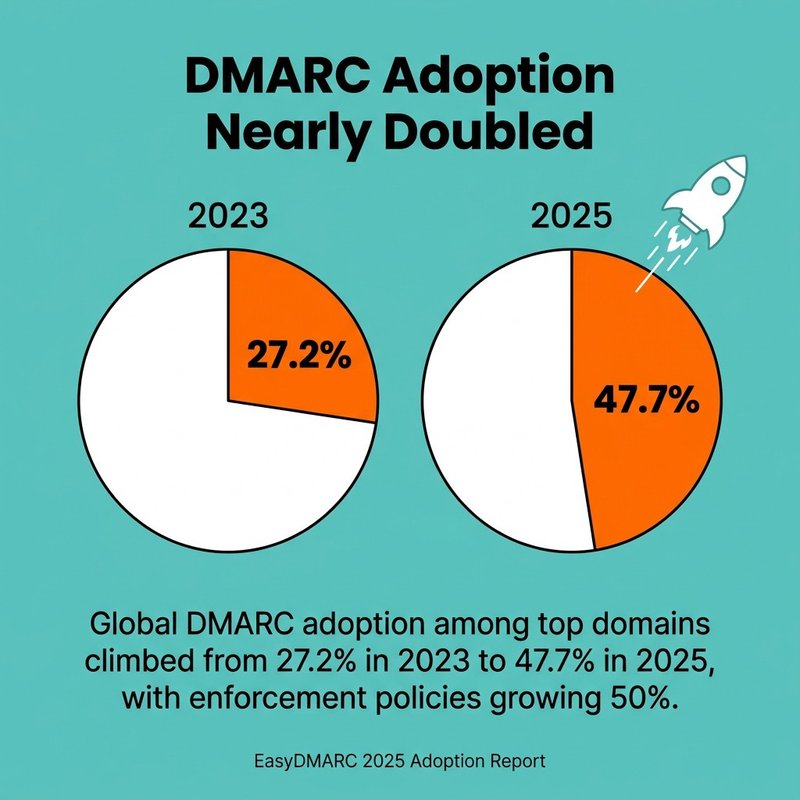
Global DMARC adoption among top domains climbed from 27.2% in 2023 to 47.7% in 2025, with enforcement policies growing 50%, according to EasyDMARC's 2025 DMARC adoption report. The driver? Google and Yahoo required bulk senders of 5,000 or more messages per day to implement SPF, DKIM, and DMARC by February 1, 2024, per Google's email sender requirements documentation. The effect was immediate: the number of unauthenticated messages Gmail users receive dropped 75% following those requirements, according to Google's official Gmail security announcement.
DMARC Policy Levels
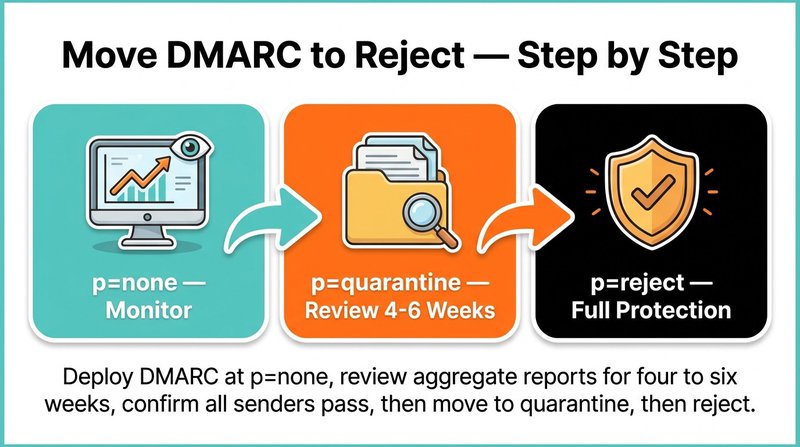
DMARC gives you three policy options, and you move through them in stages:
- none: monitoring mode. Mail is delivered normally. You receive aggregate reports to see who's sending in your name. Start here.
- quarantine: messages failing DMARC go to the spam folder. Use this once you're confident your SPF and DKIM records cover all legitimate senders.
- reject: messages failing DMARC are blocked entirely. This is full enforcement and the strongest protection against email spoofing.
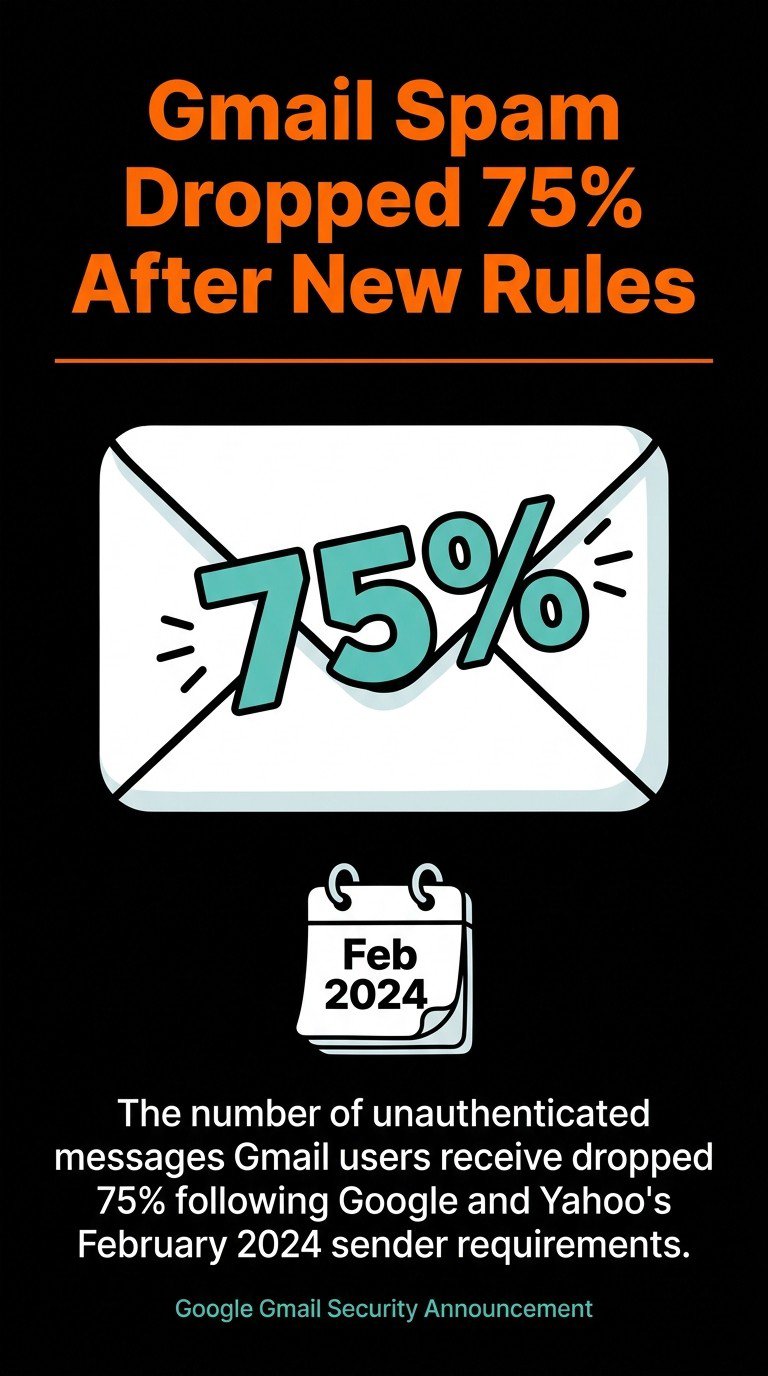
After new sender requirements, unauthenticated Gmail messages dropped by 75%.
A basic DMARC TXT record looks like this:
v=DMARC1; p=none; rua=mailto:dmarc-reports@yourdomain.com; pct=100
The rua tag sets the email address for aggregate reports. Read those reports. They show you every IP claiming to send from your domain, which is the only way to know whether you've missed an authorized sender before you tighten your DMARC policy to quarantine or reject.
Moving from None to Reject
Don't skip straight to reject. The standard path is: deploy DMARC at p=none, review aggregate reports for four to six weeks, confirm all legitimate sending sources pass SPF and DKIM, then move to p=quarantine. After another review period with no unexpected failures, move to p=reject. Rushed enforcement breaks legitimate mail flows. Patience here pays off in both domain health and email deliverability.
Additional Email Domain Security Protocols: BIMI and MTA-STS
BIMI, or Brand Indicators for Message Identification, is an email standard that displays your brand logo directly in supported email clients alongside authenticated messages, turning your DMARC enforcement into a visible trust signal in the inbox. BIMI requires a DMARC policy of quarantine or reject to function. That's not a coincidence. BIMI is designed specifically as a reward for reaching full email authentication enforcement.
To implement BIMI, you publish a DNS TXT record pointing to an SVG version of your logo, and optionally attach a Verified Mark Certificate (VMC). The VMC is issued by a certification authority and confirms your logo ownership. Without a VMC, some major email clients, including Gmail, won't display the logo. With it, your brand appears next to your emails before recipients even open them. That's a meaningful boost to both domain reputation and open rates.
MTA-STS (Mail Transfer Agent Strict Transport Security) is a separate but complementary protocol that forces email servers to use encrypted TLS connections when delivering mail to your domain. It prevents downgrade attacks, where an attacker tricks a mail server into sending mail over an unencrypted connection. You implement it by publishing a DNS TXT record and hosting a policy file at https://mta-sts.yourdomain.com/.well-known/mta-sts.txt. It's lower profile than DMARC, but it closes a real gap in email domain security.
Email Domain Security Best Practices
Solid email domain security comes down to a handful of non-negotiable habits, and getting them right consistently matters more than any single configuration change. The protocols covered above only work if they're maintained, monitored, and matched to your actual sending infrastructure.
Here's what actually moves the needle:
- Audit your SPF record every time you add or remove an email service provider. One forgotten platform left in your SPF record is an open door for abuse.
- Use a separate subdomain for transactional email. Sending transactional mail from mail.yourdomain.com instead of yourdomain.com protects your primary domain's reputation if deliverability issues arise on the transactional side.
- Rotate DKIM keys annually. A DKIM key that never changes is a security risk. Most email platforms support key rotation without downtime.
- Set your DMARC policy to reject once you've confirmed all legitimate senders. A DMARC policy stuck at p=none forever gives you reports but no protection.
- Keep your email list clean. Invalid addresses generate bounces. High bounce rates damage domain reputation with inbox providers, and that damage compounds quickly. Spam folder placement is often a deliverability signal tied directly to list hygiene, not just authentication failures.
One thing we see overlooked constantly: businesses set up SPF and DKIM correctly, then never check whether those records still work six months later after onboarding a new ESP. Add a quarterly DNS health check to your calendar. It takes ten minutes and catches problems before they become crises.
And on the list quality side, this is where mailfloss fits in. We run over 20 checks on every email address, automatically fix typos like gmal.com and yahooo.com, and integrate directly with platforms like Mailchimp, HubSpot, ActiveCampaign, and 35 others. Clean lists and solid authentication records work together. One protects your sending infrastructure, the other protects your sending reputation.
How to Check and Monitor Your Email Domain Security
Checking your email domain security means verifying that your SPF, DKIM, and DMARC records are correctly published in DNS, that your DMARC policy is enforced, and that no unauthorized senders are appearing in your aggregate reports. You can do all of this with free tools, and it should take under 20 minutes.
Start with these steps:

- Check your SPF record. Use MXToolbox ordmarcian's SPF surveyor to look up your domain's SPF TXT record. Confirm it includes all your current ESPs, your mail server IP, and ends with ~all or -all.
- Verify your DKIM signature. Send a test email to a Gmail address, open the message, click the three-dot menu, select "Show original," and check the DKIM field. It should say PASS. Alternatively, use MXToolbox's DKIM lookup with your selector name.
- Review your DMARC record and reports. Look up your DMARC TXT record at _dmarc.yourdomain.com and confirm the policy is at least p=quarantine. Log into your DMARC reporting tool, whether that'sEasyDMARC, dmarcian, or another service, and review the aggregate reports for unrecognized sending sources.
- Run a domain health check. Tools likeEasyDMARC's domain scanner and the NCSC's email security checker give you a full domain health check in one view, covering SPF, DKIM, DMARC, and MTA-STS status together.


If phishing accounted for 16% of initial breach access vectors in the Verizon 2025 DBIR, per Beyond Identity's DBIR 2025 analysis, then monitoring your domain for spoofing attempts isn't optional. It's how you know when someone is actively trying to impersonate you. DMARC aggregate reports are free threat intelligence, and most organizations never read them.
Set a calendar reminder once a month to check your DMARC report dashboard. Note any new sending sources. If an IP you don't recognize is sending email in your domain's name, that's an active attack you can now trace and report. That monthly check is the difference between knowing about a spoofing campaign and finding out when a customer calls to ask why they got a suspicious email "from you."
For a broader view of your sender reputation and email reputation monitoring strategies, pair your DMARC report reviews with regular checks of your domain against major email blocklists. Tools like MXToolbox's blacklist checker cover hundreds of lists at once. If your domain appears on one, you'll want to know before your next campaign goes out.
Getting email domain security right isn't a one-time project. It's an ongoing part of keeping your sending reputation clean, your emails landing in inboxes, and your customers safe from phishing attacks that use your name. Set up SPF, DKIM, and DMARC correctly, move your DMARC policy to reject once you're confident in your records, and check your domain health quarterly. Then make sure the list you're sending to is just as clean as the domain you're sending from. That's the full picture, and both halves matter.
No comments:
Post a Comment