Email domain security is the combination of DNS-based authentication protocols, SPF, DKIM, and DMARC, that verify a sender's identity, block email spoofing, and protect your domain reputation with every message you send. When all three protocols are correctly configured, receiving mail servers can confirm that an email actually came from your domain, not an attacker impersonating it. Without them, anyone can send email that appears to come from your address, and your recipients, your deliverability, and your brand pay the price.
We see it constantly: businesses spend months building a solid email marketing program, only to watch open rates crater because their DNS records were never set up properly. It's a frustrating problem, and the fix is more straightforward than most people expect. So let's walk through exactly what you need, how each protocol works, and how to check whether your domain is already protected.
What Is Email Domain Security?
Email domain security is a framework of authentication protocols published in your DNS that tells the world which servers are authorized to send mail on your behalf. It covers three core standards: SPF (Sender Policy Framework), DKIM (DomainKeys Identified Mail), and DMARC (Domain-based Message Authentication, Reporting and Conformance). Each handles a different layer of verification, and together they form your domain's complete defense against impersonation and spoofing.
Your DNS is essentially a public directory for your domain. When you add anSPF record, DKIM record, or DMARC record to your DNS, you're publishing a set of instructions that any receiving mail server can check before deciding whether to deliver your email. No special software on the recipient's side is required. It runs automatically, every time someone receives a message from your domain.
Think of it like this: your domain has a reputation, and that reputation is worth protecting. Every spoofed email sent in your name chips away at it, whether or not your own systems sent the message.
Why Email Domain Security Matters for Your Organization
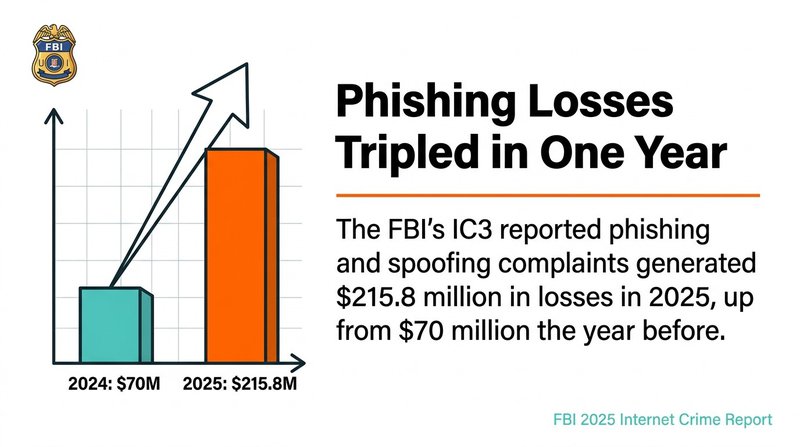
Phishing and email spoofing are among the most financially damaging threats businesses face, with the FBI's IC3 reporting that phishing and spoofing complaints generated $215.8 million in losses in 2025, up from $70 million the year before, according to the FBI's 2025 Internet Crime Report. That's a staggering jump in a single year. And it doesn't just hit large enterprises.
Your domain reputation is directly tied to email deliverability. If your domain gets flagged for spoofing activity, or if you have no DMARC policy in place to signal that you take authentication seriously, inbox providers like Gmail start routing your legitimate mail to spam. That means lower open rates, fewer conversions, and a harder climb back to inbox placement.
Compliance requirements have also tightened. PCI DSS v4.0 mandated that organizations handling cardholder data implement DMARC, SPF, and DKIM, effective March 31, 2025, according toMimecast's PCI DSS compliance analysis. This isn't just a best practice anymore. For many industries, it's a regulatory requirement. Getting your email authentication right protects your customers, your domain health, and your legal standing all at once.
And clean email lists are part of this picture too. Strong email domain security stops attackers from spoofing your domain, butemail security best practices for marketers also include keeping your own sending list free of invalid addresses that damage your sender reputation from the inside out.
How SPF Protects Your Email Domain
SPF, or Sender Policy Framework, is a DNS TXT record that lists every IP address and mail server authorized to send email for your domain. When a receiving server gets an email claiming to be from your domain, it checks your SPF record to confirm the sending IP is on your approved list. If the IP isn't listed, the email fails SPF authentication.
Setting up an SPF record is one of the fastest wins in email domain security. You add a single TXT record to your DNS, and it looks something like this:
Each mechanism has a specific job. The include: mechanism pulls in an authorized sender's IP range, like Google Workspace or your email service provider. The ip4: mechanism authorizes a specific IP address. The ~all at the end is a softfail qualifier, meaning mail from unlisted IPs will be marked suspicious but not outright rejected. Use -all (a hard fail) once you're confident you've listed every legitimate sending source.
SPF Record Mechanisms at a Glance
a: authorizes the IP address in your domain's A record
mx: authorizes IPs listed in your MX records
ip4 / ip6: authorizes specific IPv4 or IPv6 addresses
include:: imports another domain's SPF record (use for ESPs like Mailchimp or HubSpot)
~all: softfail for unlisted senders
-all: hard fail, reject mail from unlisted senders
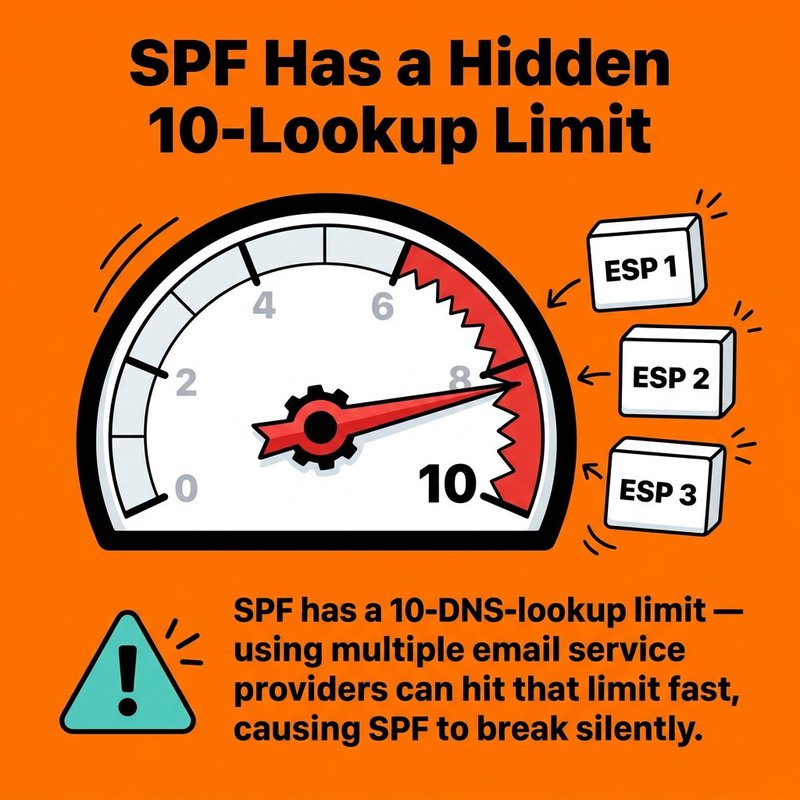
One thing to watch: SPF has a 10-DNS-lookup limit. If you use multiple email service providers, like ActiveCampaign, HubSpot, and Mailchimp all at once, you can hit that limit fast. When you do, SPF breaks silently and you won't know until deliverability drops. Audit your SPF record regularly against every platform you're actually sending from.
How DKIM Authenticates Your Outgoing Emails
DKIM, or DomainKeys Identified Mail, adds a cryptographic signature to every outgoing email, allowing receiving servers to verify that the message was genuinely sent from your domain and that its content wasn't altered in transit. It uses a public/private key pair: your mail server signs each message with a private key, and the public key is published as a DNS TXT record anyone can check.
This matters because SPF only checks the sending IP. DKIM checks the actual message content and the signing domain. An attacker who routes mail through a legitimate server can pass SPF and still fail DKIM. The two protocols cover different attack surfaces, which is exactly why you need both.
How to Set Up DKIM
The process has four steps:
Generate a public/private key pair in your email platform or mail server settings (Google Workspace, Microsoft 365, and most ESPs do this for you automatically).
Copy the public key provided by your email platform.
Add it to your DNS as a TXT record under a selector subdomain, for example: google._domainkey.yourdomain.com
Enable DKIM signing in your email platform settings and verify the record is live.
Your DKIM TXT record will look something like this:
The p= value is your public key. It should be long. If it's short, something went wrong in the generation step. Use a DKIM checker tool to confirm the record resolves correctly from external DNS before considering setup complete.
How DMARC Ties Email Authentication Together
DMARC, or Domain-based Message Authentication, Reporting and Conformance, is the policy layer that tells receiving mail servers what to do when an email fails SPF or DKIM, and it sends reports back to you showing exactly who is sending email in your domain's name. Without DMARC, SPF and DKIM failures produce no action. With DMARC, you control the outcome.
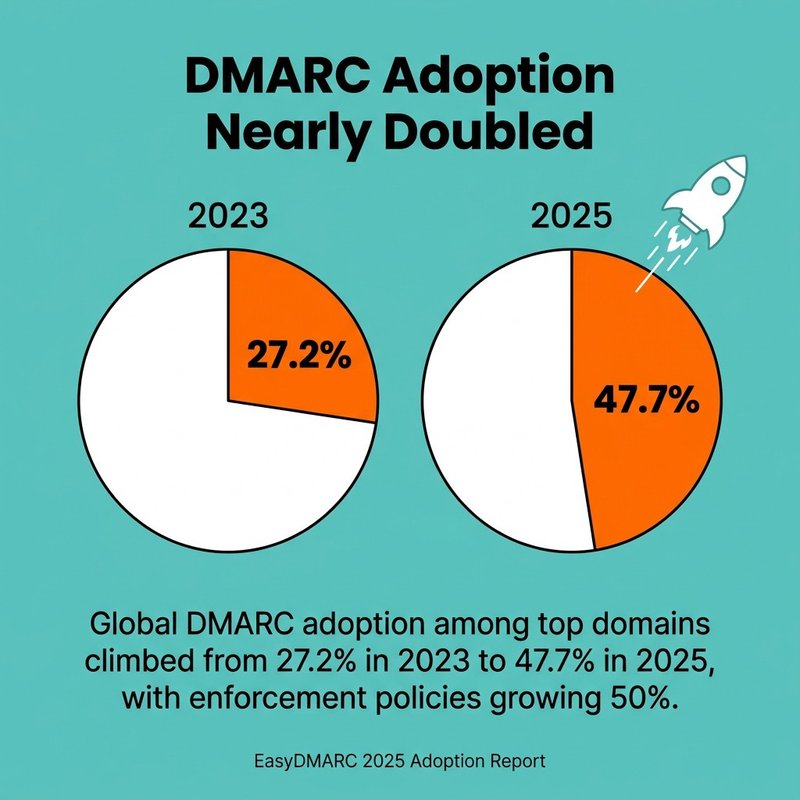
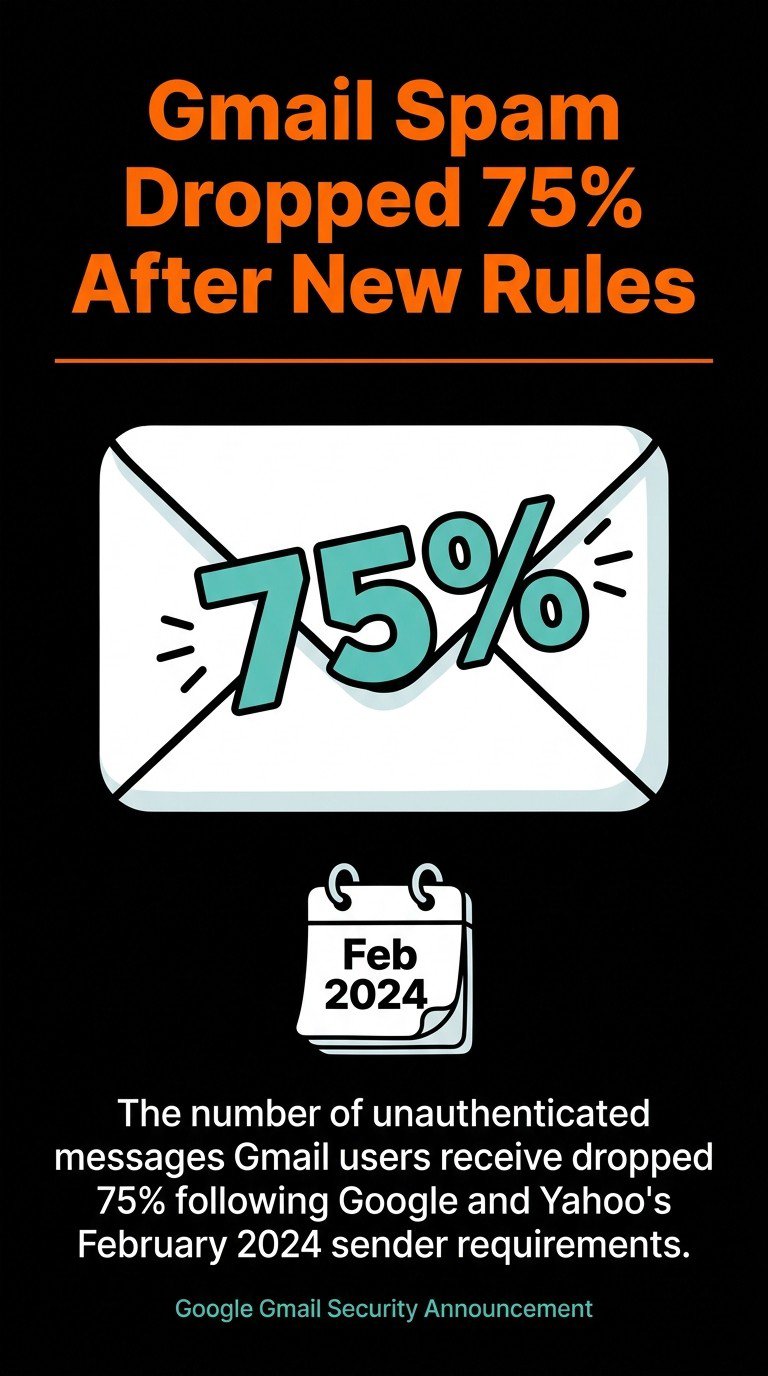
Global DMARC adoption among top domains climbed from 27.2% in 2023 to 47.7% in 2025, with enforcement policies growing 50%, according to EasyDMARC's 2025 DMARC adoption report. The driver? Google and Yahoo required bulk senders of 5,000 or more messages per day to implement SPF, DKIM, and DMARC by February 1, 2024, per Google's email sender requirements documentation. The effect was immediate: the number of unauthenticated messages Gmail users receive dropped 75% following those requirements, according to Google's official Gmail security announcement.
DMARC Policy Levels
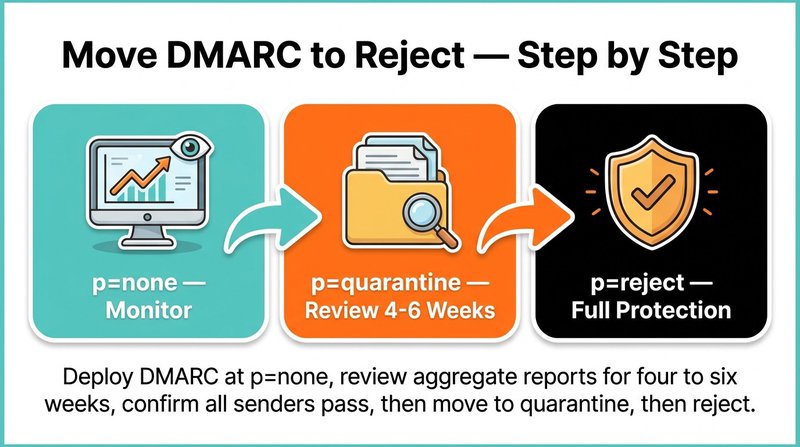
DMARC gives you three policy options, and you move through them in stages:
none: monitoring mode. Mail is delivered normally. You receive aggregate reports to see who's sending in your name. Start here.
quarantine: messages failing DMARC go to the spam folder. Use this once you're confident your SPF and DKIM records cover all legitimate senders.
reject: messages failing DMARC are blocked entirely. This is full enforcement and the strongest protection against email spoofing.
After new sender requirements, unauthenticated Gmail messages dropped by 75%.
The rua tag sets the email address for aggregate reports. Read those reports. They show you every IP claiming to send from your domain, which is the only way to know whether you've missed an authorized sender before you tighten your DMARC policy to quarantine or reject.
Moving from None to Reject
Don't skip straight to reject. The standard path is: deploy DMARC at p=none, review aggregate reports for four to six weeks, confirm all legitimate sending sources pass SPF and DKIM, then move to p=quarantine. After another review period with no unexpected failures, move to p=reject. Rushed enforcement breaks legitimate mail flows. Patience here pays off in both domain health and email deliverability.
Additional Email Domain Security Protocols: BIMI and MTA-STS
BIMI, or Brand Indicators for Message Identification, is an email standard that displays your brand logo directly in supported email clients alongside authenticated messages, turning your DMARC enforcement into a visible trust signal in the inbox. BIMI requires a DMARC policy of quarantine or reject to function. That's not a coincidence. BIMI is designed specifically as a reward for reaching full email authentication enforcement.
To implement BIMI, you publish a DNS TXT record pointing to an SVG version of your logo, and optionally attach a Verified Mark Certificate (VMC). The VMC is issued by a certification authority and confirms your logo ownership. Without a VMC, some major email clients, including Gmail, won't display the logo. With it, your brand appears next to your emails before recipients even open them. That's a meaningful boost to both domain reputation and open rates.
MTA-STS (Mail Transfer Agent Strict Transport Security) is a separate but complementary protocol that forces email servers to use encrypted TLS connections when delivering mail to your domain. It prevents downgrade attacks, where an attacker tricks a mail server into sending mail over an unencrypted connection. You implement it by publishing a DNS TXT record and hosting a policy file at https://mta-sts.yourdomain.com/.well-known/mta-sts.txt. It's lower profile than DMARC, but it closes a real gap in email domain security.
Email Domain Security Best Practices
Solid email domain security comes down to a handful of non-negotiable habits, and getting them right consistently matters more than any single configuration change. The protocols covered above only work if they're maintained, monitored, and matched to your actual sending infrastructure.
Here's what actually moves the needle:
Audit your SPF record every time you add or remove an email service provider. One forgotten platform left in your SPF record is an open door for abuse.
Use a separate subdomain for transactional email. Sending transactional mail from mail.yourdomain.com instead of yourdomain.com protects your primary domain's reputation if deliverability issues arise on the transactional side.
Rotate DKIM keys annually. A DKIM key that never changes is a security risk. Most email platforms support key rotation without downtime.
Set your DMARC policy to reject once you've confirmed all legitimate senders. A DMARC policy stuck at p=none forever gives you reports but no protection.
Keep your email list clean. Invalid addresses generate bounces. High bounce rates damage domain reputation with inbox providers, and that damage compounds quickly.Spam folder placement is often a deliverability signal tied directly to list hygiene, not just authentication failures.
One thing we see overlooked constantly: businesses set up SPF and DKIM correctly, then never check whether those records still work six months later after onboarding a new ESP. Add a quarterly DNS health check to your calendar. It takes ten minutes and catches problems before they become crises.
And on the list quality side, this is where mailfloss fits in. We run over 20 checks on every email address, automatically fix typos like gmal.com and yahooo.com, and integrate directly with platforms like Mailchimp, HubSpot, ActiveCampaign, and 35 others. Clean lists and solid authentication records work together. One protects your sending infrastructure, the other protects your sending reputation.
How to Check and Monitor Your Email Domain Security
Checking your email domain security means verifying that your SPF, DKIM, and DMARC records are correctly published in DNS, that your DMARC policy is enforced, and that no unauthorized senders are appearing in your aggregate reports. You can do all of this with free tools, and it should take under 20 minutes.
Start with these steps:
Check your SPF record. Use MXToolbox ordmarcian's SPF surveyor to look up your domain's SPF TXT record. Confirm it includes all your current ESPs, your mail server IP, and ends with ~all or -all.
Verify your DKIM signature. Send a test email to a Gmail address, open the message, click the three-dot menu, select "Show original," and check the DKIM field. It should say PASS. Alternatively, use MXToolbox's DKIM lookup with your selector name.
Review your DMARC record and reports. Look up your DMARC TXT record at _dmarc.yourdomain.com and confirm the policy is at least p=quarantine. Log into your DMARC reporting tool, whether that'sEasyDMARC, dmarcian, or another service, and review the aggregate reports for unrecognized sending sources.
Run a domain health check. Tools likeEasyDMARC's domain scanner and the NCSC's email security checker give you a full domain health check in one view, covering SPF, DKIM, DMARC, and MTA-STS status together.
If phishing accounted for 16% of initial breach access vectors in the Verizon 2025 DBIR, perBeyond Identity's DBIR 2025 analysis, then monitoring your domain for spoofing attempts isn't optional. It's how you know when someone is actively trying to impersonate you. DMARC aggregate reports are free threat intelligence, and most organizations never read them.
Set a calendar reminder once a month to check your DMARC report dashboard. Note any new sending sources. If an IP you don't recognize is sending email in your domain's name, that's an active attack you can now trace and report. That monthly check is the difference between knowing about a spoofing campaign and finding out when a customer calls to ask why they got a suspicious email "from you."
For a broader view of your sender reputation andemail reputation monitoring strategies, pair your DMARC report reviews with regular checks of your domain against major email blocklists. Tools like MXToolbox's blacklist checker cover hundreds of lists at once. If your domain appears on one, you'll want to know before your next campaign goes out.
Getting email domain security right isn't a one-time project. It's an ongoing part of keeping your sending reputation clean, your emails landing in inboxes, and your customers safe from phishing attacks that use your name. Set up SPF, DKIM, and DMARC correctly, move your DMARC policy to reject once you're confident in your records, and check your domain health quarterly. Then make sure the list you're sending to is just as clean as the domain you're sending from. That's the full picture, and both halves matter.
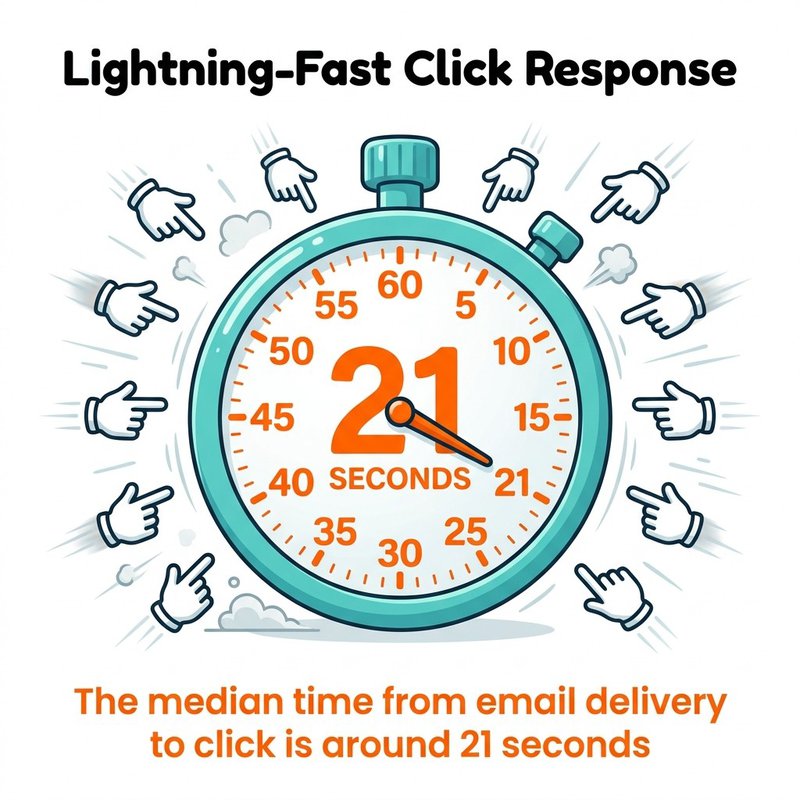
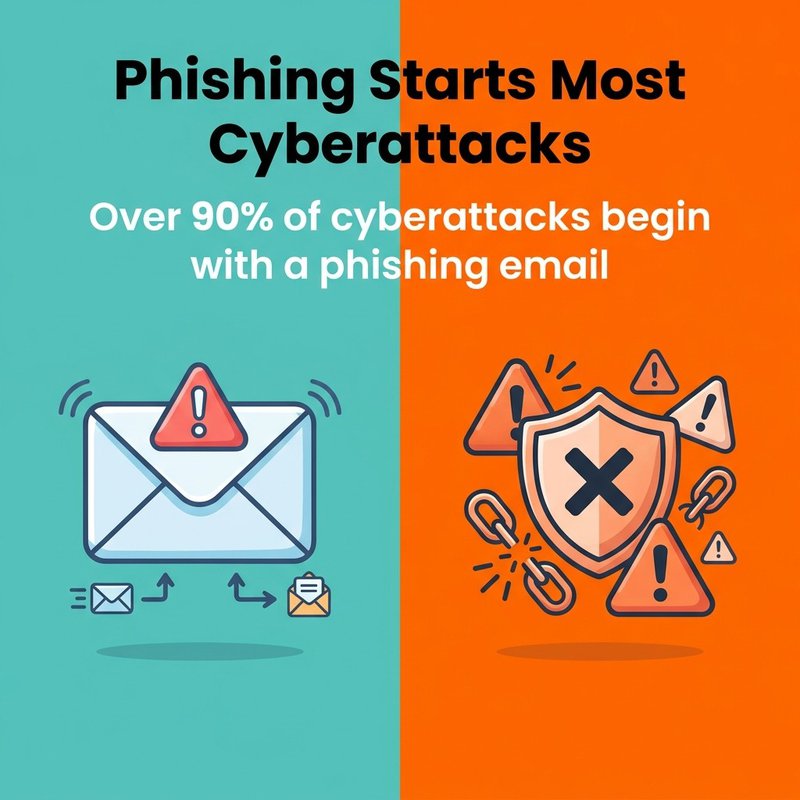
Email phishing protection requires multiple defense layers working together to block attacks that account for over 90% of cyberattacks. Effective protection combines technical controls like email authentication (SPF, DKIM, DMARC) with behavioral defenses including security awareness training that can reduce phishing susceptibility by roughly 85%. Organizations must implement both automated detection tools and human verification processes, since the median time from email delivery to click is around 21 seconds. Phishing attacks now use AI to personalize content at scale, making traditional signature-based detection insufficient.
You check your inbox and see an urgent message from your bank. Your account will be locked unless you verify your details immediately. The logo looks perfect, the sender address seems right, and panic sets in.
At mailfloss, we spend every day thinking about email security because clean, verified email lists are your first line of defense. When you know every address on your list is legitimate, you're already ahead of attackers who rely on fake addresses and compromised accounts.
You'll learn how phishing actually works, how to spot attacks before they damage your organization, and which protection strategies deliver real results. We'll cover the technical controls that stop attacks automatically and the human elements that turn your team into a security asset instead of a vulnerability.
What Is Phishing and Why It Matters Now
Phishing is a cyberattack method where criminals use deceptive emails to trick recipients into revealing sensitive information, clicking malicious links, or downloading infected attachments.
The attack exploits human psychology more than technical vulnerabilities. Cybercriminals craft messages that trigger emotional responses like urgency, fear, or curiosity. They impersonate legitimate organizations, trusted colleagues, or authority figures to bypass your natural skepticism.
Traditional email security relied on identifying known threats. Modern phishing uses unique, customized messages that signature-based detection cannot catch.
How Phishing Attacks Actually Work
Phishing attacks follow a predictable pattern that exploits both technical weaknesses and human behavior at each stage.
Next comes the delivery mechanism. Email remains the primary vector because it's universal, trusted, and reaches targets directly. The phishing email typically impersonates a legitimate entity using several deception techniques.
Email Spoofing and Domain Tricks
Cybercriminals register domains that look nearly identical to legitimate ones. They swap letters (rn instead of m), add extra words (accounts-payable-microsoft.com), or use different top-level domains (.co instead of .com).
Some attacks use actual compromised email accounts from legitimate organizations. When your colleague's account gets hacked, phishing emails sent from that account bypass many security filters because the sender is technically legitimate.
Display name spoofing shows a trusted name in your inbox preview while the actual email address remains hidden. You see "CEO John Smith" but the real address is randomstring@suspicious-domain.com.
Social Engineering Tactics
The message content uses psychological manipulation to override logical thinking. Common tactics include creating artificial urgency, appealing to authority, exploiting trust relationships, and triggering fear or greed.
Speed works in the attacker's favor. Research shows people make snap decisions when presented with urgent requests, especially from apparent authority figures.
The payload is what attackers want you to do. Clicking a malicious link takes you to a fake login page designed to steal your credentials. Opening an infected attachment installs malware that can steal data, encrypt files for ransom, or create backdoor access for future attacks.
Phishing attacks come in multiple forms, each targeting different vulnerabilities with specific tactics designed for particular victims or outcomes.
Mass Phishing Campaigns
Mass phishing casts the widest net, sending identical or similar messages to thousands or millions of recipients. These attacks use generic branding from well-known companies like banks, shipping services, or tech platforms.
The messages claim your account needs verification, a package requires delivery confirmation, or suspicious activity was detected. Success rates are low per message, but attackers compensate with volume.
Spear phishing targets specific individuals or organizations with customized messages. Attackers research their victims, referencing real projects, colleagues, or business relationships to build credibility.
These emails might appear to come from a vendor you actually work with, discussing a legitimate invoice or project update. The personalization makes spear phishing significantly more effective than mass campaigns.
Unlike mass phishing that anyone might receive, spear phishing emails contain details only someone familiar with your organization would know. This specificity lowers suspicion and increases response rates.
Whaling Attacks
Whaling targets high-value individuals like executives, senior managers, or decision-makers with financial authority. These attacks often impersonate other executives, board members, or trusted business partners.
Whaling emails use sophisticated language and business context that reflects executive-level communication. They exploit the trust and authority dynamics within organizations.
Business Email Compromise
Business Email Compromise (BEC) attacks compromise legitimate email accounts and use them to send fraudulent requests. The emails come from real accounts, making them extremely difficult to detect through technical means alone.
Common BEC scenarios include payroll diversion requests, vendor payment changes, gift card purchase requests, and wire transfer instructions. The attacker uses knowledge gained from accessing the compromised account to make requests seem routine.
BEC attacks target the intersection of email access, financial authority, and trust relationships. They bypass many technical security controls because the emails are technically legitimate.
Smishing and Vishing
While email remains the primary vector, phishing extends to other channels. Smishing uses text messages to deliver malicious links or urgent requests. Vishing employs phone calls where attackers impersonate support staff, IT departments, or officials.
Phishing emails contain identifiable patterns and red flags that reveal their fraudulent nature when you know what to look for.
Start by examining the sender address carefully. The display name might say "PayPal Security Team" but the actual address is random-letters@suspicious-domain.ru. Hover over the sender name without clicking to reveal the real email address.
Check for domain mismatches. Legitimate companies send from their official domains. Variations like paypa1.com (number one instead of letter L) or paypal-secure.net signal fraud.
Message Content Red Flags
Urgent or threatening language creates artificial pressure. Phrases like "immediate action required," "account will be suspended," or "respond within 24 hours" exploit fear to bypass rational evaluation.
Generic greetings indicate mass campaigns. Legitimate organizations address you by name because they have your account information. "Dear Customer" or "Valued Member" suggests the sender doesn't actually know you.
Grammar and spelling errors appear frequently in phishing emails. While some sophisticated attacks avoid this issue, many still contain awkward phrasing, typos, or unnatural language patterns that professional communications wouldn't include.
Mismatched branding shows when attackers copy logos but can't perfectly replicate legitimate design. Colors might be slightly off, fonts incorrect, or layouts different from authentic emails you've received previously.
Link and Attachment Analysis
Suspicious links require careful inspection before clicking. Hover over any link to preview the actual destination URL. The displayed text might say "www.yourbank.com" but the real destination is a completely different domain.
Shortened URLs (bit.ly, tinyurl.com) hide the actual destination and should raise suspicion in unexpected emails. Legitimate organizations typically use their own domains for important communications.
Unexpected attachments pose significant risk, especially executable files (.exe, .zip, .scr) or documents with macros enabled. If you weren't expecting a file from this sender, don't open it.
Request Type Evaluation
Requests for sensitive information should always trigger scrutiny. Legitimate organizations never ask for passwords, full credit card numbers, or social security numbers via email.
Financial requests require verification through separate channels. If an email asks you to transfer money, change payment details, or purchase gift cards, verify the request by calling the person directly using a known phone number (not one provided in the email).
Account verification demands deserve skepticism. Banks and services don't ask you to verify your account by clicking email links. They direct you to log in through normal channels or visit a branch.
We've seen how quickly people respond to seemingly urgent requests. Understanding these recognition patterns gives you the crucial seconds needed to pause and verify before clicking.
Technical Email Security Controls
Technical controls form the automated defense layer that filters and blocks phishing attempts before they reach your inbox.
Email Authentication Protocols
Three core protocols verify that emails actually come from legitimate sources. SPF (Sender Policy Framework) specifies which mail servers can send email on behalf of your domain. DKIM (DomainKeys Identified Mail) adds digital signatures that prove email content hasn't been tampered with.
DMARC (Domain-based Message Authentication, Reporting, and Conformance) builds on SPF and DKIM by telling receiving servers what to do with emails that fail authentication checks. It can quarantine or reject suspicious messages entirely.
Together, these protocols prevent domain spoofing and email forgery. When properly configured, they make it significantly harder for attackers to impersonate your organization or trusted partners.
Setting up these protocols requires DNS configuration. Your IT team or email service provider can implement them, but they need active management and monitoring to remain effective.
Advanced Threat Detection
Modern email security solutions use multiple detection methods to identify phishing attempts. Reputation-based filtering blocks emails from known malicious sources by maintaining databases of suspicious domains and IP addresses.
Content analysis examines email body text, subject lines, and attachments for known malicious patterns. Machine learning models identify anomalies that indicate phishing even when the specific attack is new.
Link scanning checks URLs against threat databases and analyzes destination pages for phishing indicators. Some solutions rewrite links to route through security gateways that verify safety in real-time before redirecting users.
Sandbox analysis detonates suspicious attachments in isolated environments to observe their behavior before delivery. This catches malware that traditional antivirus signatures miss.
Email Gateway Solutions
Secure email gateways sit between the internet and your email infrastructure, filtering messages before they reach user mailboxes. These solutions combine multiple detection techniques into a unified platform.
Cloud-based gateways protect organizations using platforms likeMicrosoft 365 orGoogle Workspace. They integrate with these platforms to provide additional protection layers beyond built-in filtering.
Gateway features typically include spam filtering, malware scanning, data loss prevention, encryption, and detailed logging for security investigations. They can quarantine suspicious messages for admin review rather than delivering them directly.
Configuration matters significantly. Default settings provide baseline protection, but tuning filters to your organization's specific communication patterns reduces false positives while improving threat detection accuracy.
Building a Security Awareness Training Program
Security awareness training transforms your employees from potential vulnerabilities into active defenders against phishing attacks.
Technical controls catch most threats, but humans remain the last line of defense when sophisticated attacks bypass automated filters. Training programs teach recognition skills and establish reporting procedures that contain threats quickly.
Effective training covers real attack examples your organization has encountered. Generic warnings about "suspicious emails" don't work as well as showing actual phishing attempts that targeted your industry or company.
Teach specific verification procedures. Employees need to know exactly who to contact and how when they receive suspicious requests. Establishing clear escalation paths removes the uncertainty that makes people hesitate to report concerns.
Cover social engineering tactics explicitly. When people understand the psychological manipulation techniques attackers use, they're better equipped to recognize when those tactics are being deployed against them.
Simulated Phishing Exercises
Simulation programs send realistic (but safe) phishing emails to employees and track who clicks links or submits credentials. These exercises provide valuable data about organizational vulnerability and individual susceptibility.
The goal isn't to punish people who fail tests. Instead, use simulations as teaching moments. When someone clicks a simulated phishing link, immediately provide educational content explaining what red flags they missed.
Run simulations regularly with varying difficulty levels. Start with obvious phishing examples, then gradually increase sophistication to match real-world threats your organization faces.
Department-Specific Training
Different roles face different phishing risks. Finance teams need specialized training on BEC attacks and payment fraud. Executives require awareness of whaling tactics. HR staff should understand payroll diversion schemes.
Tailor training content to the specific threats each group encounters. Generic training feels irrelevant, but role-specific scenarios demonstrate immediate practical value.
High-risk individuals like executives and finance personnel benefit from additional training frequency and more sophisticated simulation exercises that reflect the targeted attacks they're likely to face.
Essential Phishing Protection Tools
Email Security Platforms
Proofpoint Email Protection provides threat intelligence, URL defense, and attachment sandboxing specifically designed for advanced phishing attacks. It integrates with major email platforms and uses machine learning to detect new threats.
Mimecast Email Security offers cloud-based protection that includes URL rewriting, impersonation protection, and targeted threat protection against spear phishing and whaling attacks.
Barracuda Email Protection combines AI-powered threat detection with incident response tools. It identifies account takeover attempts and can automatically remediate delivered threats by removing malicious emails from all mailboxes.
Multi-Factor Authentication Solutions
MFA adds a critical secondary defense layer. Even when phishing steals passwords, attackers can't access accounts without the second authentication factor.
Duo Security provides push-based authentication, hardware tokens, and biometric verification. It integrates with hundreds of applications and provides detailed access logs for security monitoring.
Phishing-resistant MFA methods include hardware security keys, certificate-based authentication, and FIDO2 passkeys. These methods can't be phished because they use cryptographic verification tied to the legitimate website domain.
Traditional SMS-based MFA offers less protection since attackers can intercept codes through SIM swapping or social engineering. Prioritize app-based or hardware-based authentication for sensitive accounts.
Email Verification Services
Email verification tools help maintain clean email lists by identifying invalid, temporary, or suspicious email addresses before they become security problems.
At mailfloss, we automatically verify email addresses across your lists, removing invalid entries and fixing common typos that attackers exploit. When your email lists contain only verified, legitimate addresses, you reduce the attack surface and improve overall email security.
Verification integrates seamlessly with platforms includingMailchimp,HubSpot,ActiveCampaign, and over 30 other email service providers. The automated daily cleaning runs in the background, requiring no ongoing management.
Password Management Tools
1Password, LastPass, and Bitwarden generate and store unique passwords for every account. When employees use password managers, credential theft from one phishing attack doesn't compromise multiple accounts.
Password managers also help detect phishing sites. They autofill credentials only on legitimate domains, so if the manager doesn't recognize a site, that's a warning sign before you manually enter your password.
Incident Response Platforms
Security information and event management (SIEM) tools collect and analyze security logs from across your infrastructure. They help detect successful phishing attacks by identifying unusual login patterns, data exfiltration, or lateral movement within your network.
When incidents occur, response platforms coordinate investigation and remediation activities. They document timelines, track evidence, and manage communication with stakeholders and potentially regulators.
What to Do If You Fall Victim to Phishing
Fast, systematic response minimizes damage when someone clicks a phishing link or submits credentials to a fake site.
Immediately disconnect the affected device from your network if you opened an attachment or clicked a suspicious link. This prevents malware from spreading to other systems or exfiltrating data.
Immediate Containment Steps
Change passwords for any accounts you entered credentials into. Do this from a different, trusted device since the compromised one may have keyloggers installed.
If you provided financial information, contact your bank immediately to freeze cards or accounts. Report the fraud through their designated channels and monitor accounts closely for unauthorized transactions.
For work-related incidents, notify your IT security team immediately. Many organizations have incident response procedures that activate automatically when employees report potential compromises.
Document everything. Take screenshots of the phishing email, note what information you provided, and record times when actions occurred. This documentation helps incident response teams assess damage and guides remediation efforts.
System Remediation
Run complete antivirus and anti-malware scans on the affected device. Use updated security software from trusted sources, not programs suggested in the phishing email itself.
Check for unauthorized account changes. Attackers often modify email forwarding rules, add delegates to calendars, or change phone numbers and recovery emails for persistence.
Review recent account activity for suspicious actions. Check sent folders for emails you didn't send, file access logs for data you didn't view, and login histories for unrecognized locations or devices.
Communication and Reporting
Report the phishing attempt to your email provider. Most have dedicated reporting mechanisms that feed threat intelligence systems and improve filtering for everyone.
File reports with relevant authorities. The FBI's Internet Crime Complaint Center accepts phishing reports, and theAnti-Phishing Working Group collects threat data to combat phishing globally.
Notify potentially affected contacts if your account sent phishing emails. Attackers frequently use compromised accounts to target your contacts since those recipients trust emails from you.
Learn from the incident. Analyze what red flags you missed and use the experience to improve your recognition skills. Sharing lessons learned helps colleagues avoid similar mistakes.
GDPR requires notification within 72 hours of discovering a personal data breach. Similar requirements exist under CCPA, HIPAA, and other regulations depending on your industry and location.
Document your response timeline and actions taken. Demonstrating prompt, appropriate response can mitigate regulatory penalties even when breaches occur.
Frequently Asked Questions
Can I be hacked if I reply to an email?
Simply replying to an email with plain text usually will not compromise your device. The real risks come from clicking malicious links, opening infected attachments, or entering passwords on fake phishing sites. However, replying confirms your address is active, which may increase future spam or targeted attacks.
Is there a way to stop phishing emails completely?
You cannot completely stop phishing emails, but you can greatly reduce them. Use email provider spam filters, enable multifactor authentication, keep software updated, and report phishing messages. Organizations should add technical controls like email authentication (SPF, DKIM, DMARC), security awareness training, and phishing reporting tools.
Which email service is least likely to be hacked?
No email service is hack-proof, but accounts are least likely to be compromised when you use a major provider with strong security features, enable multifactor authentication, use a unique long password, and keep recovery options updated. Your security configuration and habits matter more than the specific provider.
Building Your Phishing Defense Strategy
Effective phishing protection isn't a single tool or training session. It's an ongoing process that combines technical controls, human awareness, and systematic response procedures.
Start with the technical foundation. Implement email authentication protocols, deploy advanced threat detection, and ensure MFA protects all critical accounts. These automated defenses handle the majority of phishing attempts without requiring human intervention.
Layer in the human element. Regular training transforms employees from targets into sensors who detect and report sophisticated attacks that bypass technical filters. Simulated phishing exercises identify gaps and build recognition skills through practice.
Establish clear response procedures. When (not if) someone clicks a phishing link, your organization needs documented steps that contain damage quickly. Everyone should know who to contact, what to do with their device, and how to report incidents without fear of punishment.
Maintain clean email infrastructure.Email verification best practices ensure your lists contain only legitimate, verified addresses. This reduces your attack surface and improves the signal-to-noise ratio for security monitoring.
Your security posture improves through continuous, incremental enhancements. Each small improvement compounds over time, creating resilient defenses that adapt as threats change.
Take action today. Verify your email authentication settings are configured correctly. Schedule the next training session. Test your incident response plan. Small steps now prevent major incidents later
Email privacy compliance requires organizations to obtain explicit consent before sending commercial messages, honor unsubscribe requests within ten business days, protect personal data through encryption and access controls, and maintain detailed consent records for regulatory audits.
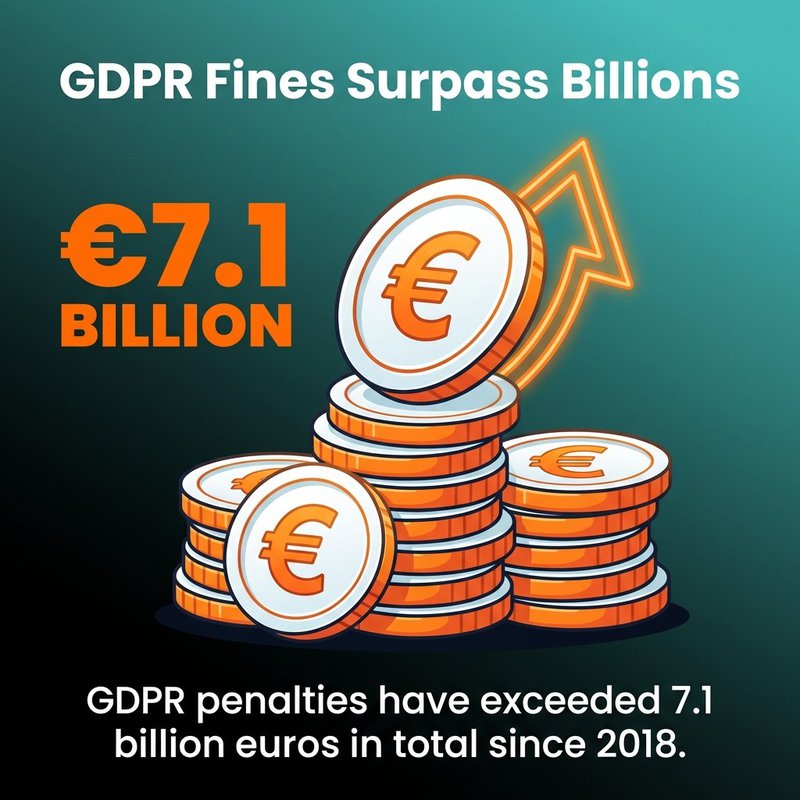
GDPR penalties have exceeded 7.1 billion euros in total since 2018, demonstrating that enforcement actions carry real financial consequences. Organizations handling email marketing across borders must comply with regulations in every jurisdiction where recipients are located, whether operating from the US, EU, Canada, or elsewhere.
The core principles remain consistent across global privacy laws: transparency, consent, data minimization, and accountability.
You've probably noticed how crowded your inbox gets with promotional emails, right? Behind every legitimate marketing message sits a complex web of privacy laws designed to protect your personal data and give you control over who contacts you. If you're running email marketing campaigns for your business, understanding email privacy compliance isn't just about avoiding penalties (though those can be steep). It's about building trust with your audience and making sure your messages actually reach their intended inboxes instead of getting flagged as spam or worse.
What Email Privacy Compliance Actually Means for Your Business
Email privacy compliance governs how businesses collect, store, and use personal data in email marketing and communications. The regulations cover everything from obtaining permission to send emails to handling unsubscribe requests to protecting stored email addresses from breaches.
Email compliance sits at the intersection of marketing effectiveness and data protection. You need explicit permission to send commercial emails in most jurisdictions. You must provide clear opt-out mechanisms. You're required to protect personal data with appropriate security measures.
The good news? Most compliance requirements align with marketing best practices anyway. Clean email lists perform better than purchased lists. Permission-based marketing generates higher engagement than cold outreach. Secure data handling protects your business reputation.
Core Compliance Principles Across All Regulations
Every major email privacy law shares common themes, even though specific requirements differ.
Consent sits at the foundation. You need permission before sending marketing emails. The definition of "permission" varies, with some laws requiring explicit opt-in and others allowing implied consent under specific conditions.
Transparency matters throughout the relationship. Recipients should know who's emailing them, why they're receiving messages, and how to stop future communications. Your privacy policy should explain data collection, storage, and usage practices clearly.
Data security protects the personal information you've collected. Email systems often store sensitive personal data, making them attractive targets for attackers. Encryption, access controls, and monitoring help reduce breach risks.
Accountability means maintaining records that prove compliance. Consent logs, unsubscribe processing records, and security documentation become crucial during regulatory audits or customer disputes.
GDPR treats email addresses as personal data, subjecting them to comprehensive protection requirements. You need a lawful basis to process email addresses, with consent being the most common basis for marketing purposes.
Consent under GDPR must be freely given, specific, informed, and unambiguous. Pre-checked boxes don't count. Bundled consent (where agreeing to one thing requires agreeing to another) fails GDPR standards. The individual must take a clear affirmative action, like clicking a checkbox or confirming via email.
Explicit Opt-In and Double Opt-In Practices
GDPR requires explicit opt-in for email marketing, meaning recipients must actively agree to receive your emails before you send them. This differs from opt-out approaches where you send emails until someone asks you to stop.
Double opt-in provides the strongest proof of consent. After someone submits their email address, you send a confirmation email asking them to verify their subscription. They must click a confirmation link before joining your list.
Double opt-in offers two key benefits. First, it proves the person actually controls the email address and consented to receive your emails. Second, it improves list quality by filtering out fake addresses and reducing spam complaints.
Tools like Mailchimp, ActiveCampaign, and ConvertKit offer built-in double opt-in functionality. Enable this feature in your email service provider settings to automate the confirmation process.
Data Subject Rights You Must Honor
GDPR grants individuals specific rights over their personal data, and you must have processes to honor these requests within required timeframes.
The right to access means people can ask what personal data you hold about them. You must provide a copy of their data within one month, free of charge for the first request.
The right to erasure (often called "right to be forgotten") requires you to delete personal data upon request under certain conditions. This goes beyond simple unsubscribe processing to complete data removal from your systems.
The right to data portability lets individuals receive their personal data in a structured, commonly used format. They can request you transmit this data directly to another controller when technically feasible.
The right to object allows people to stop processing of their personal data for direct marketing purposes. You must honor these objections and stop sending marketing emails immediately.
Set up internal workflows to handle these requests within GDPR's one-month timeframe. Document each request and your response for compliance records.
GDPR Penalties and Enforcement Reality
GDPR enforcement has proven serious and costly for violators. Maximum penalties reach 4% of annual global turnover or 20 million euros, whichever is higher.
Enforcement actions target both major corporations and smaller businesses. Data protection authorities prioritize cases involving significant data breaches, lack of consent, and failure to honor data subject rights.
Common violations include sending marketing emails without proper consent, failing to provide clear privacy information, not implementing appropriate security measures, and ignoring data subject requests.
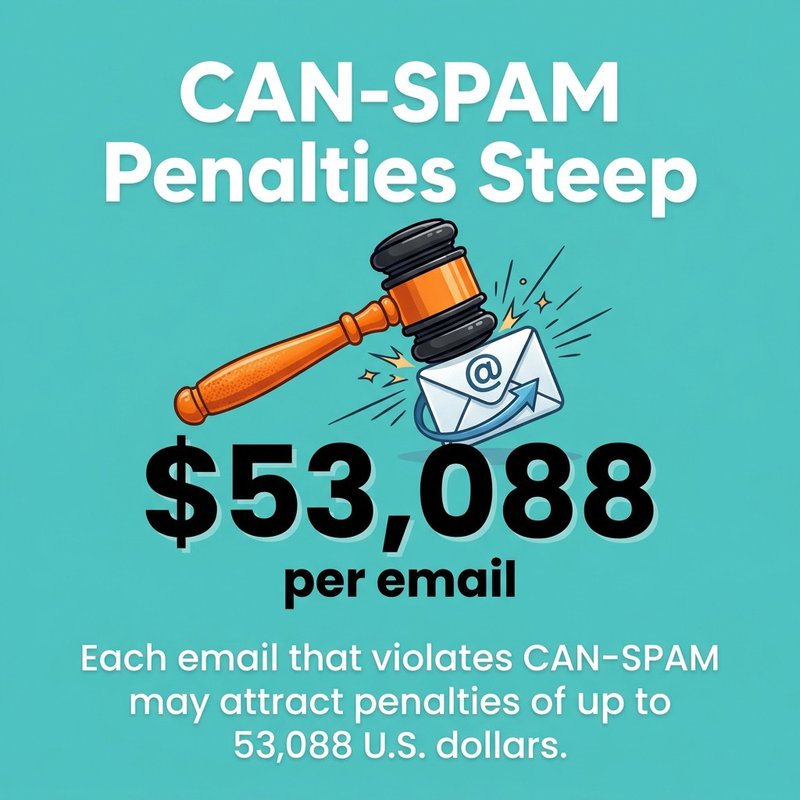
CAN-SPAM applies to commercial electronic mail messages, defined as emails promoting or advertising commercial products or services. Transactional messages like order confirmations and account updates fall outside CAN-SPAM requirements.
Unlike GDPR, CAN-SPAM follows an opt-out model rather than opt-in. You can send commercial emails to anyone without prior permission, but you must honor unsubscribe requests promptly.
Required Email Header Information
CAN-SPAM mandates accurate header information in every commercial email. Your "From," "To," "Reply-To," and routing information must accurately identify the business sending the message.
Deceptive subject lines are prohibited. Your subject line must accurately reflect the email content. Subject lines designed to mislead recipients about the message content violate CAN-SPAM.
You must identify messages as advertisements unless the recipient gave prior consent to receive your emails. The identification requirement offers flexibility in how you label commercial content.
Include your valid physical postal address in every commercial email. This can be your current street address, post office box registered with the US Postal Service, or private mailbox registered with a commercial mail receiving agency.
Unsubscribe Mechanism Requirements
Every commercial email must include a clear, conspicuous opt-out mechanism. Recipients should easily see and understand how to unsubscribe from future emails.
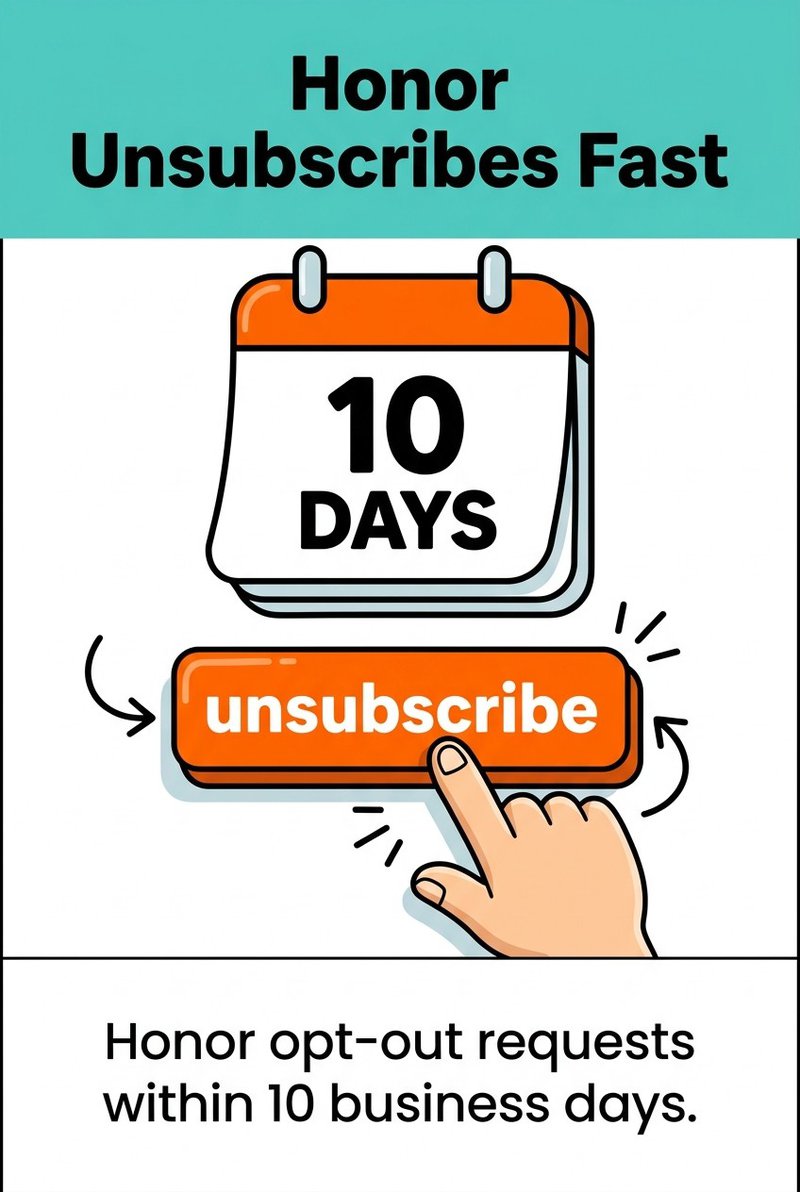
The opt-out mechanism must work for at least 30 days after sending the message. You cannot require recipients to log into an account or visit multiple pages to unsubscribe. A single click or reply email should complete the process.
Honor opt-out requests within 10 business days. After someone unsubscribes, you cannot send them additional commercial emails. You cannot sell or transfer their email address to another business, even to handle the unsubscribe request.
Most email service providers automate unsubscribe processing. HubSpot, Constant Contact, and similar platforms include compliant unsubscribe links in email templates automatically.
Keep unsubscribe requests simple. Requiring recipients to explain why they're leaving or navigate through retention offers before completing unsubscribe violates CAN-SPAM's "easy opt-out" requirement.
Third-Party Email Responsibility
CAN-SPAM holds both the company whose product is promoted and the company that actually sends the message responsible for compliance. If you hire an email marketing agency or use an affiliate program, both parties share legal responsibility.
This shared responsibility means you cannot outsource compliance risk. Monitor third-party vendors sending emails on your behalf. Their violations become your violations under CAN-SPAM.
Include compliance requirements in vendor contracts. Require regular compliance reports from agencies handling your email marketing. Audit third-party campaigns periodically to verify compliance.
CASL follows an opt-in model stricter than CAN-SPAM. You need express or implied consent before sending commercial electronic messages to Canadian recipients.
Express consent requires clear, explicit agreement to receive commercial messages. The consent request must clearly state why you're seeking consent, and the recipient must affirmatively agree.
Implied consent exists in specific situations, like existing business relationships or when the recipient conspicuously published their email address without restrictions. Implied consent expires after set timeframes, usually two years.
CASL Message Content Requirements
Every commercial electronic message must identify who is sending the message. Include your business name or the name of the person sending on behalf of the business.
Provide accurate contact information, including either a physical mailing address or web address, telephone number, or email address. Recipients should be able to contact you easily.
Include an unsubscribe mechanism in every message. The mechanism must allow recipients to opt out easily, without any cost. You must honor unsubscribe requests within 10 business days.
Keep consent records for as long as you rely on the consent plus one additional year. Your records should prove when consent was obtained, what the person consented to, and how they provided consent.
Business Relationship Exemptions
CASL recognizes implied consent based on existing business relationships. If someone purchased or leased a product, good, or service from your business within the past two years, implied consent exists during that period.
Inquiries or applications create shorter implied consent periods. If someone asks about your products or services, you have six months of implied consent to send related commercial messages.
Membership relationships with clubs, associations, or voluntary organizations create implied consent during the membership period plus two years.
Even with implied consent, you must include identification information and unsubscribe mechanisms in every message. Implied consent just removes the requirement to obtain express permission before the first message.
CASL Penalty Structure
CASL violations carry significant penalties. Maximum penalties reach 10 million Canadian dollars for businesses and 1 million Canadian dollars for individuals.
The Canadian Radio-television and Telecommunications Commission (CRTC) enforces CASL and has issued multiple violation notices. Enforcement targets businesses lacking proper consent, failing to provide unsubscribe mechanisms, and sending misleading messages.
CASL also allows private right of action, meaning individuals can sue businesses for violations. Potential damages reach 200 Canadian dollars per violation up to 1 million Canadian dollars total per day.
CCPA and US State Privacy Laws
The California Consumer Privacy Act (CCPA) and similar state privacy laws create additional compliance obligations for businesses handling California residents' personal data, including email addresses.
CCPA grants California residents specific rights over their personal information. The right to know what personal information you collect about them. The right to delete personal information under certain circumstances. The right to opt out of personal information sales.
Email addresses qualify as personal information under CCPA. If your business meets CCPA's threshold requirements (annual gross revenues exceeding 25 million dollars, buying or selling personal information of 100,000 or more California residents, or deriving 50% or more of annual revenue from selling personal information), you must comply with CCPA requirements.
Your privacy policy must disclose what categories of personal information you collect and the purposes for collection. You must describe California residents' rights and explain how to exercise those rights.
Other State Privacy Laws Emerging
Virginia, Colorado, Connecticut, Utah, and other states have enacted their own privacy laws modeled partially on CCPA. Each law includes slight variations in requirements, thresholds, and enforcement mechanisms.
Common themes across state privacy laws include consumer rights to access, delete, and correct personal information, requirements for clear privacy notices, and obligations to honor opt-out requests.
Most state privacy laws focus on broader data privacy rather than email marketing specifically. However, your email list and marketing practices fall within their scope when handling residents' personal information.
Businesses operating nationwide should consider implementing privacy practices that satisfy the strictest state requirements. This approach simplifies compliance across multiple jurisdictions.
Privacy Policy Requirements for Email Marketing
Multiple regulations require clear privacy policies explaining your data practices. Your privacy policy should cover email address collection, storage, usage, and sharing practices specifically.
Explain what information you collect when someone subscribes to your email list. Describe how you use email addresses (marketing, transactional messages, analytics, etc.). Disclose whether you share email addresses with third parties and for what purposes.
Detail the security measures protecting stored email addresses and other personal data. Explain how long you retain email addresses and the criteria determining retention periods.
Describe the rights available to individuals regarding their email addresses and other personal data. Provide clear instructions for exercising those rights, including contact information for privacy requests.
Make your privacy policy easily accessible. Link to it from your website footer, email subscription forms, and commercial emails. Update it whenever your data practices change.
Building Compliant Email Lists Through Proper Consent
Email list quality begins with proper consent management. Permission-based lists perform better and carry lower compliance risk than purchased or scraped lists.
Purchased email lists almost never include proper consent for your specific business. The people on those lists didn't agree to receive emails from you, even if they agreed to receive emails from the seller.
Scraped email addresses from websites, directories, or social media violate most privacy regulations. These addresses lack any consent to receive commercial messages from you.
Build your email list organically through clear opt-in processes. Offer valuable content or benefits in exchange for email subscriptions. Be transparent about what subscribers will receive and how often.
Opt-In Form Best Practices
Design subscription forms that clearly explain what people are signing up for. Avoid vague language like "subscribe to updates." Instead, specify "receive weekly marketing emails about our products."
Use unchecked checkboxes for consent. Pre-checked boxes don't constitute valid consent under GDPR and many other regulations. The subscriber must take affirmative action to agree.
Separate marketing consent from other agreements. Don't bundle email marketing consent with account creation, purchase completion, or other transactions. Let people opt in independently.
Keep consent requests simple and clear. Avoid complicated language or lengthy explanations buried in terms of service. State the specific purpose plainly.
Popular email service providers like Drip, Klaviyo, and GetResponse offer customizable opt-in forms with compliance features built in.
Consent Documentation and Record Keeping
Maintain detailed records proving you obtained proper consent for each email address on your list. Consent records become crucial evidence during regulatory audits or spam complaints.
Record when consent was obtained (date and time). Capture what the person consented to (specific language from the consent request). Document how consent was provided (checkbox click, form submission, etc.).
Store the IP address and other technical details from the consent event. This information helps verify the consent was legitimate and not fraudulent.
For double opt-in processes, maintain records of both the initial subscription and the confirmation click. The confirmation email and verified response prove active consent.
Keep consent records for as long as you rely on the consent plus additional time required by applicable regulations. CASL requires consent records for one year after you stop relying on the consent.
Managing Consent Over Time
Consent isn't always permanent. Some regulations require renewing consent periodically. Some consent types (like implied consent) expire after set timeframes.
Monitor consent expiration dates and remove email addresses when consent expires. Alternatively, reach out before expiration to request renewed consent.
Honor consent scope limitations. If someone consented only to receive product updates, don't send them promotional offers without obtaining broader consent first.
Make preference management easy. Provide options beyond simple unsubscribe, like reducing email frequency or selecting specific content types. This approach helps retain subscribers who want less communication rather than none.
Encryption protects data both in transit and at rest. Use TLS (Transport Layer Security) for email transmission to prevent interception. Encrypt stored email addresses and associated personal data in your databases.
Access controls limit who can view and use email list data within your organization. Implement role-based access, granting employees only the permissions needed for their specific responsibilities.
Authentication mechanisms like SPF (Sender Policy Framework), DKIM (DomainKeys Identified Mail), and DMARC (Domain-based Message Authentication, Reporting, and Conformance) help prevent email spoofing and improve deliverability.
Email Authentication Setup
SPF specifies which mail servers can send emails from your domain. Create an SPF record in your DNS settings listing authorized sending servers. This prevents spammers from forging emails that appear to come from your domain.
DKIM adds a digital signature to outgoing emails. The signature verifies the email wasn't altered during transmission and actually came from your domain. Configure DKIM through your email service provider and DNS settings.
DMARC builds on SPF and DKIM by telling receiving servers how to handle emails that fail authentication checks. Set up DMARC policies to protect your domain reputation and monitor for spoofing attempts.
Most email marketing platforms handle authentication setup with step-by-step guidance. AWeber, Sendlane, and Campaign Monitor provide authentication configuration tools in their settings.
Develop a documented incident response plan before a breach occurs. Identify who needs to be notified (leadership, legal counsel, affected individuals, regulatory authorities). Determine notification timeframes required by applicable regulations.
GDPR requires breach notification to supervisory authorities within 72 hours of becoming aware of the breach if it poses a risk to individuals' rights and freedoms. You must also notify affected individuals without undue delay in certain circumstances.
Other regulations have similar notification requirements with varying timeframes and thresholds. Know which laws apply to your business and their specific breach notification rules.
Practice your response plan periodically through tabletop exercises. Identify gaps or unclear procedures before a real incident occurs.
Email List Hygiene and Verification
Regular list cleaning removes invalid addresses and reduces bounce rates. High bounce rates signal poor list quality to inbox providers, damaging your sender reputation.
Invalid email addresses waste resources and skew campaign metrics. They never convert because they never reach real recipients. Removing them improves your effective engagement rates.
Typo correction helps legitimate subscribers receive your emails. Common typos in email domains (like "gmal.com" instead of "gmail.com") prevent delivery to valid addresses.
Automated email verification tools check addresses in your list against multiple validation criteria. They identify syntax errors, invalid domains, role-based addresses, temporary addresses, and known complainers.
At mailfloss, we automate this entire process for you. Our system connects with platforms like Ontraport, Infusionsoft by Keap, and over 30 others. Set it up once in about 60 seconds, and we'll handle ongoing verification in the background.
We run over 20 verification checks on each address and automatically fix typos in major email domains. You can configure automatic actions like deleting invalid addresses, unsubscribing bounced contacts, or updating tags for better segmentation.
Cross-Border Email Compliance Considerations
Email marketing often crosses international borders, triggering multiple jurisdictions' privacy laws. A business in the United States sending emails to Canadian and European subscribers must comply with CAN-SPAM, CASL, and GDPR simultaneously.
Determining applicable regulations depends on recipient location, not sender location. Your physical business location matters less than where your subscribers live.
Implementing the strictest standard across your entire email program simplifies compliance. If GDPR requires explicit opt-in and CASL requires similar consent, using explicit opt-in for all subscribers (regardless of location) ensures compliance everywhere.
International Data Transfer Requirements
GDPR restricts transfers of personal data outside the European Economic Area. Adequate protection must be in place before transferring EU residents' email addresses to other countries.
Standard Contractual Clauses provide one mechanism for lawful international data transfers. These are pre-approved contract terms between data exporters and importers ensuring adequate data protection.
Some countries receive adequacy decisions from the European Commission, meaning their data protection laws are considered equivalent to GDPR. Transfers to these countries don't require additional safeguards.
If your email marketing platform stores data in multiple geographic regions, verify where your subscribers' data is actually stored and processed. Major platforms like Intercom and Customer.io offer data residency options.
Multi-Jurisdiction Compliance Strategy
Map out which regulations apply to your business based on your subscriber locations. Companies with global lists typically need to comply with GDPR, CAN-SPAM, CASL, and various other national or regional laws.
Create a compliance matrix showing each regulation's requirements side by side. Identify areas where requirements differ significantly and where they overlap.
Implement practices meeting the highest standards across all applicable regulations. This unified approach is often simpler than maintaining separate compliance processes for different jurisdictions.
Consider geographic segmentation for special cases where truly conflicting requirements exist. Most regulations allow more protective practices than required, so erring on the side of stronger privacy protections rarely creates compliance issues.
Regulation
Geographic Scope
Consent Model
Key Requirement
GDPR
EU residents
Opt-in
Explicit consent required
CAN-SPAM
US recipients
Opt-out
Honor unsubscribes within 10 days
CASL
Canadian recipients
Opt-in
Express or implied consent needed
CCPA
California residents
Notice and opt-out
Disclose data practices and honor deletion requests
Email Privacy Compliance Checklist
Use this practical checklist to audit your current email marketing practices and identify compliance gaps.
Consent and List Building
Obtain explicit opt-in consent before adding addresses to marketing lists
Use unchecked checkboxes for consent (never pre-check consent boxes)
Implement double opt-in to verify email addresses and strengthen consent proof
Maintain detailed consent records including date, time, IP address, and consent language
Avoid purchasing or scraping email lists (build organically only)
Separate marketing consent from other agreements or transactions
Clearly state what subscribers will receive and how often
Review and refresh consent periodically when required by regulation
Email Content and Technical Requirements
Include accurate sender identification in every commercial email
Provide valid physical postal address in all marketing emails
Use truthful, non-deceptive subject lines reflecting message content
Include clear, conspicuous unsubscribe link in every email
Ensure unsubscribe mechanism works for at least 30 days after sending
Process unsubscribe requests within 10 business days maximum
Stop sending commercial emails immediately after unsubscribe
Set up SPF, DKIM, and DMARC authentication for your sending domain
Data Protection and Security
Encrypt email addresses and personal data both in transit and at rest
Implement role-based access controls limiting who can view list data
Regularly verify email addresses to remove invalid entries and reduce bounces
Correct common typos in email domains automatically
Develop and document an incident response plan for potential breaches
Train staff on privacy requirements and secure data handling practices
Review vendor and third-party email service provider security practices
Maintain audit logs of access to personal data and email lists
Privacy Policy and Documentation
Maintain clear, accessible privacy policy explaining email data practices
Describe what personal information you collect and why
Explain how individuals can exercise their privacy rights
Disclose data retention periods and deletion criteria
Document all data processing activities involving email addresses
Keep records proving compliance with applicable regulations
Review and update privacy documentation when practices change
Make privacy policy available from subscription forms and emails
Ongoing Compliance Monitoring
Conduct regular compliance audits of email marketing practices
Monitor regulatory changes in jurisdictions where your subscribers are located
Review bounce rates and engagement metrics to identify list quality issues
Track and respond to data subject rights requests within required timeframes
Audit third-party vendors handling email marketing on your behalf
Test unsubscribe mechanisms regularly to ensure they work properly
Review complaint rates and investigate patterns indicating compliance issues
Update practices as new regulations emerge or existing ones change
Sector-Specific Email Privacy Requirements
Certain industries face additional email privacy obligations beyond general regulations like GDPR and CAN-SPAM. Healthcare, financial services, and education sectors operate under specialized privacy frameworks.
HIPAA (Health Insurance Portability and Accountability Act) governs healthcare providers, health plans, and healthcare clearinghouses in the United States.HIPAA penalties per violation range from USD 145 to 2,190,294, depending on the violation's severity and whether it resulted from willful neglect.
Protected health information (PHI) includes any health-related information that can identify an individual. Email addresses combined with health information constitute PHI under HIPAA, requiring additional safeguards.
Healthcare Email Security Requirements
HIPAA requires covered entities to implement administrative, physical, and technical safeguards protecting PHI. Email communications containing PHI must be encrypted or secured through other means preventing unauthorized access.
Patient consent requirements under HIPAA differ from marketing consent under GDPR or CASL. HIPAA allows certain healthcare communications without marketing consent, but non-treatment marketing requires authorization.
Business associate agreements are mandatory when third-party email service providers access PHI. The agreement must specify how the provider will safeguard PHI and limit its use and disclosure.
Healthcare organizations should use email platforms offering HIPAA-compliant features, including encryption, access controls, and business associate agreement signing.
Financial Services Privacy Rules
Financial institutions face privacy requirements under regulations like the Gramm-Leach-Bliley Act (GLBA) in the United States. These rules govern how financial information is collected, shared, and protected.
Financial institutions must provide privacy notices explaining information sharing practices and offer opt-out rights for certain disclosures. Email marketing to customers must respect these privacy choices.
Security safeguards protecting customer information extend to email systems storing or transmitting financial data. Encryption, access controls, and monitoring help satisfy these security requirements.
Educational Institution Requirements
Schools and universities handling student information must comply with FERPA (Family Educational Rights and Privacy Act) in the United States. FERPA restricts disclosure of student education records without consent.
Email addresses from student records fall under FERPA protection when used in educational contexts. Marketing emails to students or parents may require consent depending on the message content and purpose.
Educational institutions often operate under additional state and local privacy regulations affecting email communications with students, parents, and alumni.
Artificial Intelligence and Future Email Compliance
AI systems processing personal data for email marketing must comply with existing data protection regulations. GDPR's data protection principles (lawfulness, fairness, transparency, purpose limitation, data minimization, accuracy, storage limitation, integrity, and confidentiality) apply equally to AI-driven and traditional processing.
Automated decision-making and profiling create additional compliance considerations. GDPR grants individuals rights regarding solely automated decisions that produce legal or similarly significant effects.
Transparency in AI-Powered Email Marketing
When AI systems make decisions about who receives emails, what content they see, or when messages are sent, transparency becomes crucial. Recipients should understand how their data influences the emails they receive.
Privacy policies should explain AI usage in email marketing. Describe what automated decisions occur, what personal data feeds those decisions, and what logic drives the automation.
Predictive analytics identifying likely purchasers or engaged subscribers involves profiling under GDPR. Individuals have the right to object to profiling and request human review of automated decisions.
Data Minimization in AI Training
AI models often require training data to improve performance. Using personal data from email lists to train AI models raises privacy concerns and compliance questions.
Ensure your lawful basis for processing covers AI training, or obtain separate consent if needed. The original consent to receive marketing emails may not extend to using that data for AI model training.
Minimize personal data in training datasets when possible. Anonymize or pseudonymize data to reduce privacy risks while maintaining model effectiveness.
Consider whether individuals' data subject rights (access, deletion, correction) can be honored after data enters AI training sets. Technical limitations in removing individual data points from trained models may conflict with deletion requests.
Maintaining Email Privacy Compliance for the Long Term
Email privacy compliance isn't a one-time project but an ongoing responsibility requiring regular attention and adaptation.
Establish internal ownership for email compliance. Designate someone responsible for monitoring regulatory changes, conducting compliance audits, and updating practices as needed.
Create documented procedures for common compliance tasks. How do you process data subject rights requests? What steps do you take when someone unsubscribes? How do you respond to potential breaches? Written procedures ensure consistency.
Train your team on privacy requirements and secure practices. Everyone handling email marketing or accessing subscriber data should understand basic compliance obligations and security protocols.
Compliance Auditing and Monitoring
Conduct regular audits of your email marketing program. Review consent records, unsubscribe processing, email content, technical security measures, and vendor compliance.
Set a recurring audit schedule, quarterly or semi-annually depending on your email volume and complexity. Document audit findings and remediation actions taken.
Monitor key metrics indicating potential compliance issues. High bounce rates suggest list quality problems. Elevated spam complaint rates signal consent or relevance issues. Unusual access patterns might indicate security concerns.
Review vendor compliance regularly. Third-party email service providers, analytics tools, and marketing automation platforms all process your subscribers' data. Ensure they maintain appropriate security and comply with relevant regulations.
Staying Current with Regulatory Changes
Privacy regulations continue evolving. New laws emerge at state, national, and international levels. Existing regulations receive clarifying guidance and enforcement precedents.
Subscribe to regulatory updates from data protection authorities in jurisdictions relevant to your business. The FTC, state attorneys general, CRTC, and European Data Protection Board all publish guidance and enforcement actions.
Participate in industry associations sharing compliance information. Many sectors have trade groups tracking regulatory developments and offering compliance resources to members.
Consult legal counsel specializing in privacy law when significant changes occur or when entering new geographic markets. Professional guidance helps interpret complex regulations and implement appropriate controls.
Building Trust Through Transparency
Compliance protects your business from penalties, but transparency builds lasting relationships with subscribers. People appreciate businesses that respect their privacy and communicate honestly about data practices.
Exceed minimum compliance requirements when doing so strengthens subscriber trust. Offer more control over communication preferences than regulations require. Provide clearer explanations of data practices than minimum standards demand.
Make privacy a competitive advantage. Subscribers increasingly choose businesses demonstrating genuine commitment to data protection. Your privacy practices can differentiate your brand.
Respond promptly and professionally to privacy inquiries and requests. How you handle individual concerns demonstrates your commitment to privacy beyond written policies.
Email privacy compliance protects both your subscribers and your business. The regulations might seem complex, but they ultimately support better email marketing practices. Permission-based lists outperform purchased ones. Engaged subscribers convert better than random contacts. Secure data handling prevents costly breaches.
Start by implementing proper consent processes and maintaining clean email lists.Understanding opt-in best practices creates a foundation for compliant growth. Use tools that automate compliance tasks like email verification and unsubscribe processing. Focus on building genuine relationships with subscribers who actually want to hear from you.
Your email list represents people who trusted you with their contact information. Honor that trust through transparent practices, appropriate security, and respectful communication. The regulatory requirements simply formalize what good email marketing has always demanded: permission, relevance, and respect.